
This article summarises how to use and access the Event Impact and Summary features.
Video 1: About Event Impact, Video 2: About the Event Impact Summary Page
How can it help you?
It can be hard to communicate cost savings in an effective way. However, with Event Impact, you can easily establish the cost of your maintenance efforts and quantify the impact of preventative and event-based maintenance.
How does it work?
The Event Impact feature allows you to track the costs associated with maintenance events on each of your monitored assets. The feature allows you to add costs associated with any alarms you've received, for instance, pertaining to the maintenance of the asset such as parts and labour, and contrast these costs against expected losses if the asset were to break down.
There are two main aspects of the Event Impact feature:
- The Event Impact Page
- The Event Impact Summary
The Event Impact Page
The Event Impact Page is a page specific to one event. It is where you can include an overview of the costs associated with an event.
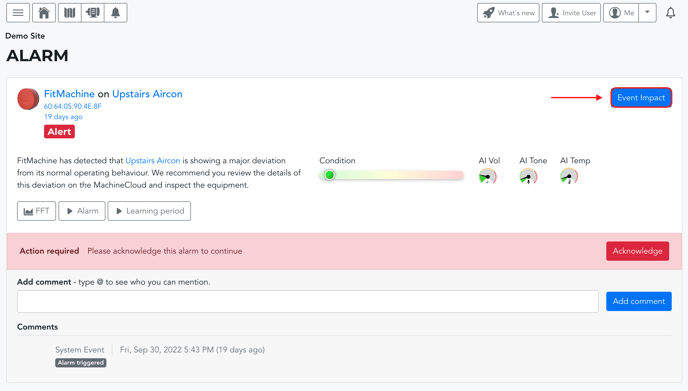
You can access the Event Impact Page from each alarm's Alarm Detail Page (accessible via the Alarms Page), whether that’s a Condition Alarm, Measured Data Alarm, or User Event.
On the Alarm Detail Page, you'll find an Event Impact button:
Once selected, the Event Impact Page should appear, similar to this:
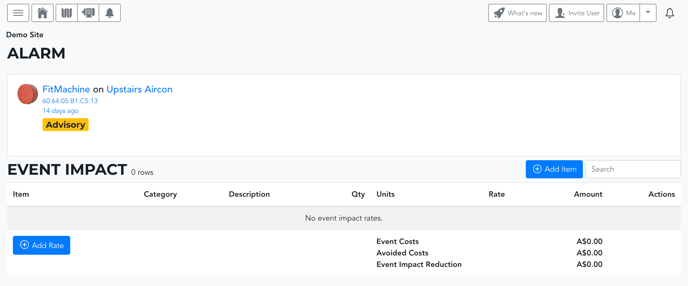
Here you can add Rates and Items.
Adding Rates
Step one here is to add Rates.
A rate is an action associated with the event and its cost. For example, rates could include base labour and parts. The rates that are added using this feature will be saved against this asset and can be selected at any time moving forward (for any alarm triggered for that asset) from the Add Item page. Hence, you only need to do this once.
Clicking 'Add Rate' will open the following window:
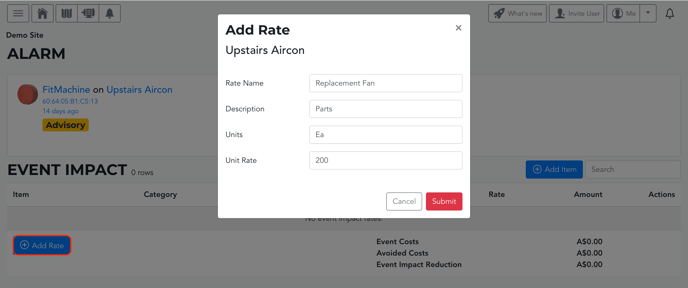 This window allows you to define a Rate by giving it a name, a description, a unit of measure and the cost per rate.
- Description: Any additional information required to describe this rate.
- Units: A measure of the Rate (e.g. hours, cost per part, etc.)
- Unit Rate: Cost per unit of Rate
You can add as many rates as are applicable to that asset. Please note though that two rates cannot have the same name. Once a second one is entered, the first will be replaced.
For now, in order for the Hours Lost and Avoided Hours Lost data to be included/calculated in the Event Impact Summary, any rate that uses 'hours' as its unit will need to include the word ‘Production’ in the Rate Name.
You can also add event impact rates for equipment via the Equipment Detail Page. Specifics of this process are outlined later in the Event Impact Summary section of this article.
Adding Items
Once you’ve defined the Rates for an asset, you can add each line item associated with this particular event.
Clicking the Add Item Button allows you to add your pre-defined Rates and Quantities and Categorise these Rates into one of 3 categories; Actual, Estimated and Avoided Costs.
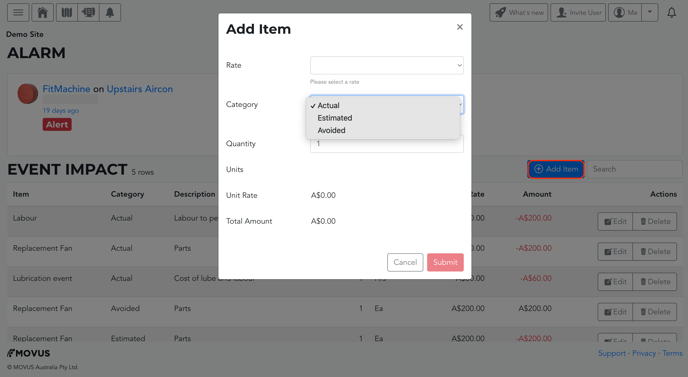
- Actual Costs incurred: These are costs that are associated with this event that were incurred by the business such as parts, or labour/contractor costs.
- Estimate Costs incurred: These are costs that need to be accounted for, but that can't be invoiced or an exact cost cannot be measured. For example, estimating how much grease was used during maintenance.
- Avoided Costs: These are the costs evaded thanks to your early detection and intervention. Ie., if this work wasn’t performed, or if this issue wasn’t detected and there was a failure on this asset, what would the cost have been to the business? Examples include:
- Lost production costs should a failure have occurred
- Lost product costs
- Avoided labour costs
- Avoided parts costs
- Contractual obligations (service downtime)
The Quantity is the number of units associated with this rate. Be careful to check the Units field to assign the correct quantity.
Once input, your Event Impact Page should look something like this:

Please note that the 'Event Costs' listed at the bottom of the page are the sum of the input Actual and Estimated Costs.
You can Edit and Delete Rates from the Impact table using the respective buttons on the right-hand side of the table.
Pro Tip: Using the Groups Sidebar, you can create rates that apply to all equipment within that device group, rather than having to input individual rates for each piece of equipment. This feature is highlighted later in the Event Impact Summary section of this article.
The Event Impact Summary
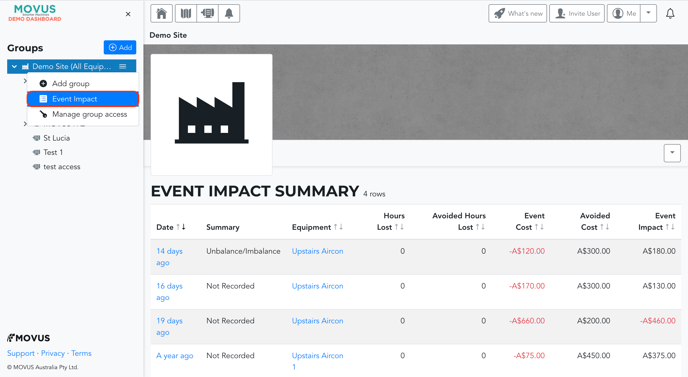
The Event Impact Summary collates the costs of different events over time and shows how much money has been saved against a particular asset, or for a particular device group.
Group Summary
You can access the Summary for a group by selecting the Event Impact from the Groups Sidebar on the left-hand side of the page. Here you will see a summary of the total costs of each event for each asset in that group.
As per normal standards, debits will appear as negative numbers and be coloured red, while avoided costs will appear as positive numbers coloured black.
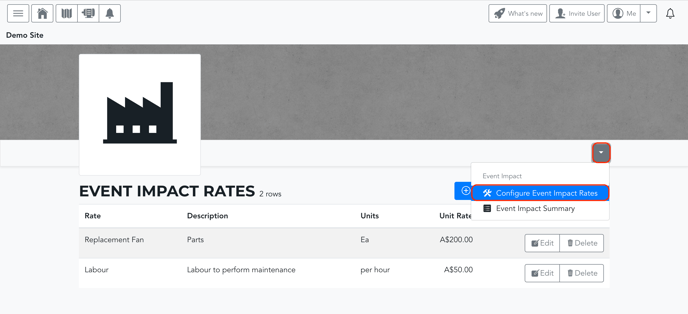
On this page, you also have the option to configure Event Impact Rates for all equipment within that device group. This can be accessed by clicking the down arrow (see below). The process is the same as outlined prior.
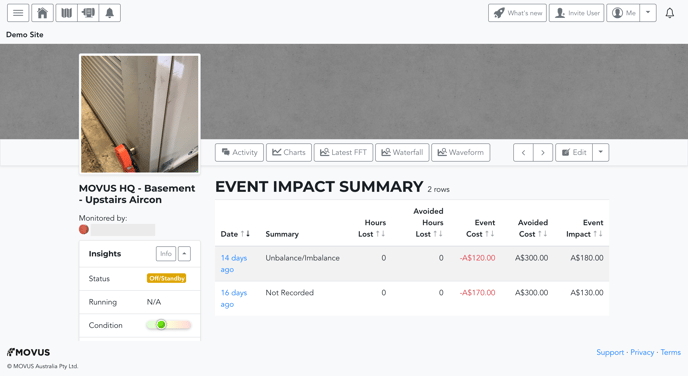
Equipment Summary
You can also access the Summary for an individual piece of equipment via an asset's Equipment Detail Page using the drop-down menu in the top right-hand corner. Clicking 'Event Impact Summary' will take you to the summary page. 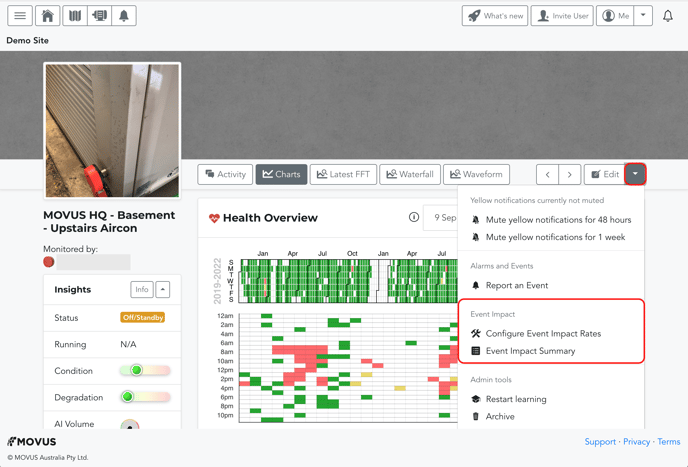
Here you will find the total costs of each event for that asset.
Notably, you also have the option here to configure Event Impact Rates for that specific equipment. This is an alternative to adding rates via an Alarm Detail Page. This is a great option for newly onboarded equipment which have yet to alarm.
What else should I look at?
- About the Equipment Detail Page
- The Alarm Detail Page
- Understanding Event Feedback
- Understanding Mentions
- About Alarm Statuses
--
Thanks for reading! If you have any questions or concerns, please reach out to MOVUS Support here.