
This article outlines what User Groups is, how it helps you, and everything you need to know about its functionality.
What is User Groups?
User Groups refers to the dashboard's user management functionality, whereby you can group and organise user accounts.
This has been added as an extension of our existing Groups feature, which allows you to group devices, to improve user and permissions management.
To help you understand this feature better, this article will explain:
- How user groups can help you
- How to create a user group
- How to edit a user group
- How to grant a user group access to a device group
Please note, this article assumes your organisation has already created device groups. If you're unsure how to do this, please first read this article here.
How Does User Groups Help Me?
The 4 key benefits are that you can:
- Allocate multiple users to a device group at once
Having users grouped saves you from having to individually edit users to alter which devices they have access to. Instead, you can create a user group, and quickly and easily allocate all users within that group to any device groups they need access to.For example, you could create a user group of the frontline staff who work with the pumps at your Brisbane plant, and then allocate them to your Brisbane pumps device group. Now, all of your staff in this user group have access to your Brisbane pumps.
- Alter the permissions of multiple users at once
Grouping users means that you can alter the permissions of all the users within that group, for each device group they have access to, at once. With User Groups, you can ensure users only have admin access where you want them to, on a mass scale, and ensure they can't edit groups they don't have authority over.
For example, you can set all users within your frontline staff user group to have admin access to your Brisbane pumps, but read-only access to your Brisbane compressors. There are three permission levels you can set: read, write or admin. These are explained in further detail in our article About User Permissions. Importantly, users must have a Standard User type or higher to be granted write or admin access. Restricted Users can only be granted read access. - Easily segment your staff so that users only see the assets they require on their dashboard
Being able to create user groups, and allocate them to device groups, means that on their dashboard the only devices users will see are those they have been granted access to.
For example, unless the frontline staff have been given access to them, they won't see any other groups other than the Brisbane pumps and compressors. - Ensure users only get notifications relevant to them
With user groups, users will only get notifications for the devices they have access to. This can be tailored further using our Alarm Channels feature.
How to Create a User Group
To create a user group, you must have standard user access to your organisation.
If you do, select your organisation name on the Groups sidebar, and click the blue 'Add' button. Next, type in a name for the group, click 'User Group', then click 'Add Group' (shown below).
In this instance, the 'User Group' type is the only group type of relevance. You can group users based on seniority, location, assets they are responsible for, or any other way that you organise your team.
A General Group is a high-level grouping you can use to group device and user groups. This is designed to make navigation easier and to help you keep related groups together. For example, this might be the Brisbane plant, under which the Brisbane pumps and Brisbane compressors might be grouped, as well as your frontline staff user group.
A Device Group is an equipment group. This is how you can group related assets based on location, type, or anything of relevance. In this example, this would be the Brisbane pumps.
How to Edit a User Group
To edit a user group, and add or remove users, click on the three lines next to the user group's name in the sidebar. This will bring up a drop-down menu. On this menu, you have the option to add a sub-group, rename the group, remove the group, or manage group access. Clicking 'Manage Group Access' will bring up the management page.
Please note: If a parent group is a device group, then any sub-groups must also be device groups. The same is for user groups.

Once on the management page, click the blue 'Add' button on the 'Group Users' bar (see gif below). Next, select any relevant users. You can click 'Include All', or 'Include None', to mass add or remove, users.
Remember to scroll down and click the green 'Update' button at the bottom of the user list to save your changes. You can then click 'Back to access summary' to return to the management page.
To exit this page, click on any navigational button along the top of the screen.
How to Grant a User Group Access to a Device Group
Once you have created a user group, you can grant that user group access to any relevant device groups. To do so, you'll need to access the management page for the device group in question. This is the same process as editing a user group. Simply click the three lines next to the device group's name in the sidebar, and click 'Manage Group Access'.
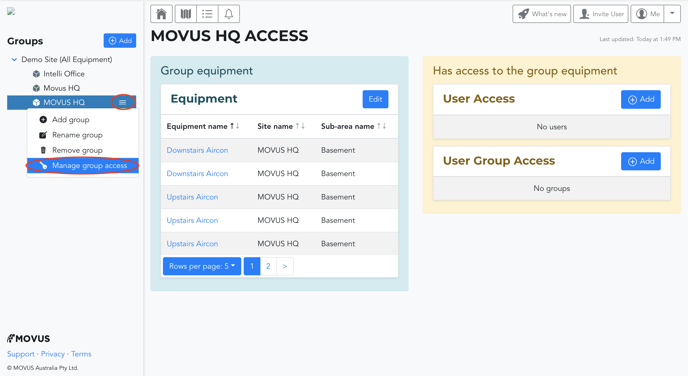
On this page you can:
- See and edit (add/remove) devices within the group
- Grant read/write/admin permissions to individual users (User Access) or a user group (User Group Access) for that device group.
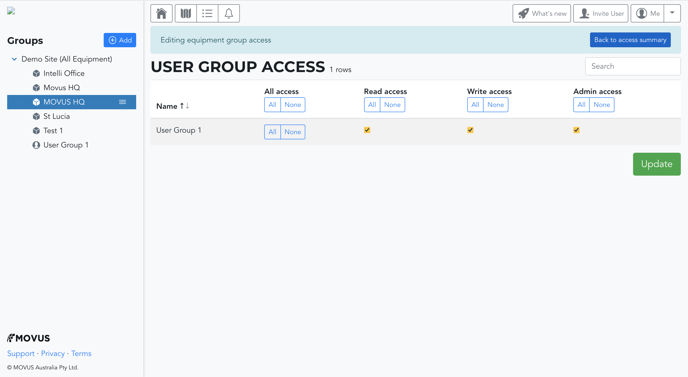
To grant a user group access to a device group, click the blue 'Add' button next to 'User Group Access'. Find the user group you want to grant access to and select whether you want to grant them read, write, or admin access. What each of these permission levels means is explained in our article About User Permissions. Remember to hit the green 'Update' button at the bottom of the page to save your changes.
This is the same process for granting an individual user access to the group when you click the blue 'Add' button next to 'User Access'. On this page, however, you'll have a list of all users, instead of the user groups.
---
Thanks for reading. As always, if you have any questions or concerns, please contact MOVUS Support here.